

Hi and welcome to this seasonal Christmas jumper How To guide. I’ll walk you through the process of creating a jumper stitch pattern using Illustrator, and then Photoshop. Following the steps you’ll produce a final template file that will make your stitch pattern for any new image you drop in. You’ll then have a .png file with transparency you can upload to a T-shirt printing site like streetshirts.co.uk.
Some specs on what you’ll make
The authentic stitch design with a single stitch color looks just like a real jumper. The final image is just less than 35cm x 45cm at 300dpi with pixel dimensions 4080 x 5280. It’s made up from 100 pairs of stitches across and 130 stitches down with each stitch a 40 x 40 pixel square, together with, an additional blank area one stitch wide around the edge. Once you’re done, you’ll be able to add any image you like to your file and generate a stitch pattern. Since your final file will be png, you’ll work in RGB throughout and let the printers handle the conversion from RGB.
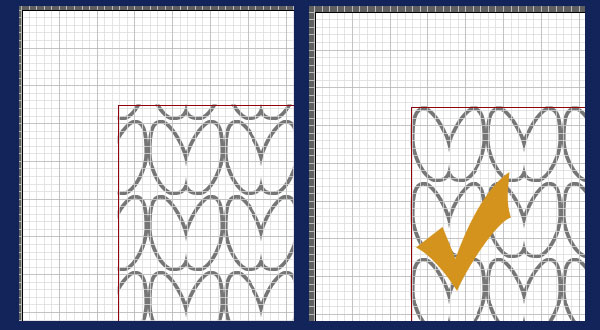
Here’s what you’ll create.

STAGE 1 – MAKE THE ILLUSTRATOR STITCH MASK
Step 1 – File creation and settings to make life easier
Go ahead and start Illustrator and create a new file with the following settings:-
- Name: Jumper Mask
- Units: Pixels
- Dimensions: 4080px wide, 5280px high
- (Advanced Options) Color Mode: RGB
Now that you have your new Artboard, let’s make life easier for ourselves. The mask needs to be pixel perfect so it aligns with the mosaic version of our image.
- Menu View > Snap to Pixel: Make sure this is on
- Menu Edit > Preferences > Guides & Grid:
- Gridlines every 10px
- Subdivisions 10
- Grids in Back – Off
- Menu View > Smart Guides: Make sure this is on
- Menu View > Show Grid: Make sure this is on
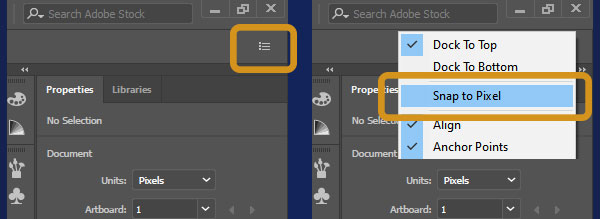
Click the Controls Panel Settings on the far top right of the work area and then select ‘Snap to Pixel’.
Click the ‘Align Art to pixel grid’ option so it is switched on (should have a dark background when on). Steps shown below.
After that, open the Layer panel, rename the initial layer to ‘Mask Back’, and then create a new layer, renaming it ‘Mask Stitching’.
Now that’s done, let’s get on with that first pair of stitches.
Step 2 – Single Pair of Stitches Creation
Firstly start by zooming in to the top left corner of the Artboard with the ‘Mask Stitching’ layer selected @ 400%.
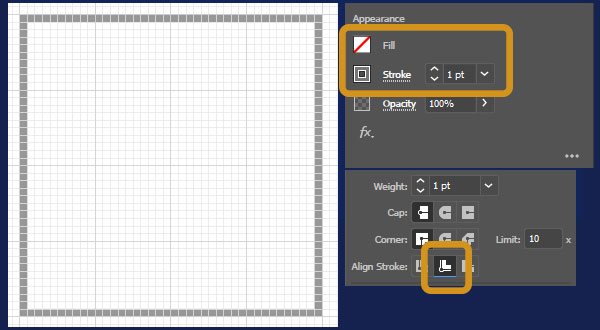
Create a rectangle (M) and then style it as below. This is a temporary box, the size of each of the mosaic tiles we’ll be creating later; basically it will help ensure we align the stitches properly. Positioning the square so it aligns with the bolder lines of the grid helps to see everything is symmetrical.
- Width: 40px
- Height: 40px
- Fill: None
- Stroke: Mid grey (exact color doesn’t matter), width: 1pt, alignment : inside path
Create an ellipse (L) with the same styling as the box, then align it with the left and top edge of the box.
- Width: 20px
- Height: 40px
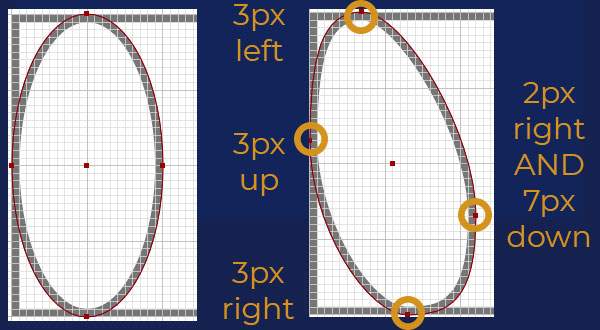
The last step in creating our first stitch is to adjust the individual anchor points as shown in the pic below.
With the ellipse selected, select the reflection tool (O) then Alt + Left Click anywhere on the centre line of the box, this will open up the reflection dialogue box for you to click ‘Copy’. As a result, you now have an instant reflected copy – easy as that.
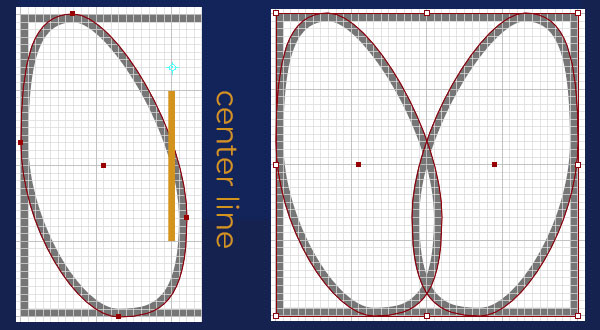
With both stitches selected, we’re now going to create a slightly smaller version.
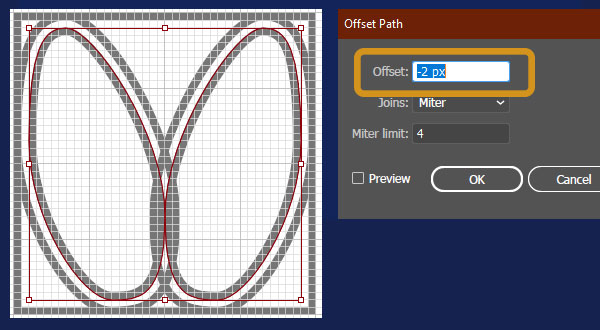
- Menu Object > Path > Offset Path: Offset set to -2px (that’s a negative two pixels!)
Select the original larger pair of stitches and then unite them by clicking the pathfinder option that appear in the Properties area. Now do the same with the smaller pair of stitches but hold Alt while clicking unite to get a compound shape. At this point the resulting final shape and layer structure can be seen below.
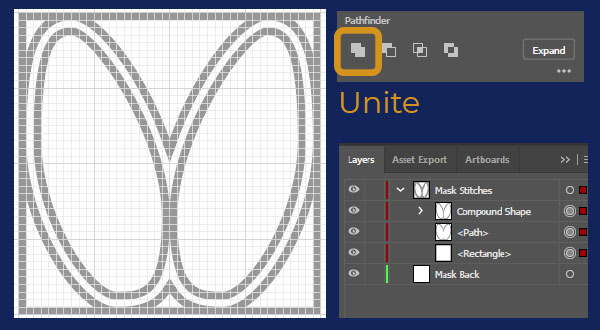
We don’t need the layout rectangle any more so delete it.
Style the larger of the two stitches:-
- Stroke: None
- Fill: RGB 128,128,128
Style the smaller of the two stitches:-
- Stroke: None
- Fill: RGB 255,255,255
Step 3 – Making and using a Stitch Pattern to create the final mask
Now that we have our stitch, we’re going to use the pattern creation feature to create the full 100 x 130 stitches. These 13,000 vectors shapes can result in Illustrator being a little sluggish, so using a pattern helps speed up the process.
Making the Pattern
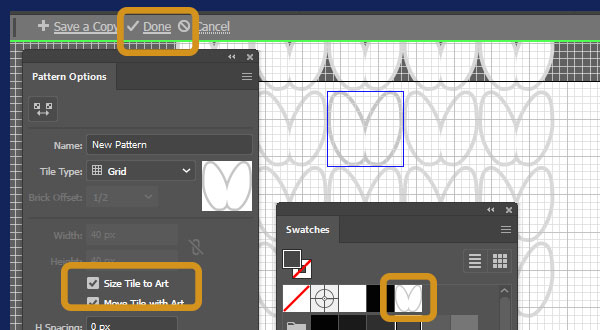
Select all the objects.
- Menu Object > Pattern > Make:
- Select Size Tile to Art
- Select ‘Done’ from Pattern banner at the top of the workarea.
You will see a new swatch appear in your swatches menu showing a tiny version of the stitches. You can see the key parts of these steps shown below.
Hide the objects you’ve created by clicking the eye on the layers panel.
Set a zoom of 100% but still so you can see the top left corner of the artboard.
Using the Pattern
Now we’ll fill a large rectangle with our stitch pattern, so create a rectangle (M) and then style it as below.
- Width: 4000px
- Height: 5200px
- Fill: Stitch Pattern (select from Swatch panel)
- Stroke: None
You may be lucky and the stitch pattern starts snugly in the top left hand corner of the rectangle but probably not. You’ve probably got something like the pattern on the left and we want the pattern on the right.
With the rectangle selected, click the Transform Panel menu option (burger icon) and choose, ‘Transform Pattern only’.
Zoom in to 400%, select the X position value and then scroll the mouse wheel up and down until the left edge of the pattern lines up with the edge of the rectangle. Do the same now with the Y position value.
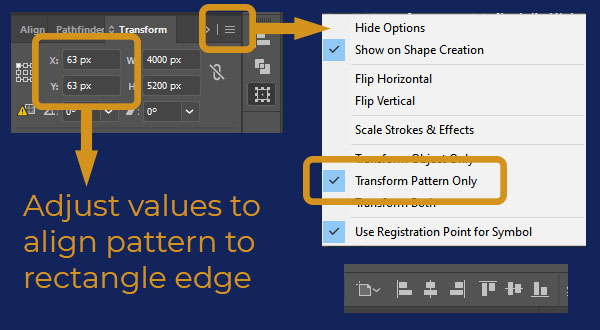
Zoom back out to 100% and then Click the Transform Panel menu option (burger icon) and choose, ‘Transform Both’. This is especially important as you’ll undo all your alignment efforts in the next step if you don’t.
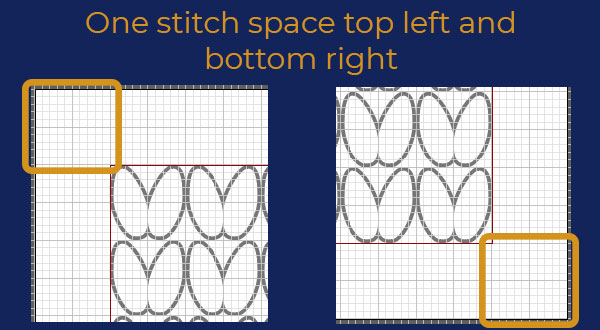
The next step is to position the rectangle centrally to the art board, so use the align centre and align middle. When in the correct position it should have a gap of one stitch around the edge of the whole rectangle. So go ahead and check the bottom right corner to see that the gap outside is one stitch and the pattern fits neatly up to the right side and bottom edge. When it’s right the corners should look like this.
Finally Go the ‘Mask Back’ layer and create a rectangle (M) then style it as follows:
- Width: 4080px
- Height: 5280px
- Fill: RGB 0,0,0
- Stroke: None
Align to the edges of the artboard and that’s the vector mask created.
Rasterise the Pattern
The final step is to rasterise the vector pattern so, hide the grid first (as we don’t need it now), select the pattern rectangle and then select:-
- Menu Effect > Rasterize: Resolution set to High (300dpi)
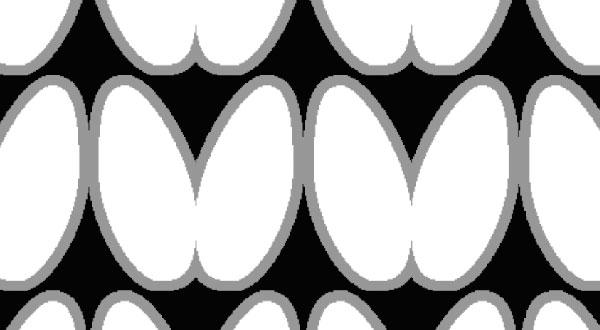
It might take a few moments to calculate this and it also may warn you that it has turned off automatic saving because it will slow performance. This is because the rasterizing has just created a massive file typical of Photoshop and Illustrator just got scared. It’ll be okay, don’t worry. Zooming in the rasterized vector now looks like.
Step 4 – File creation for use in Photoshop Stage
We want a hi-res version of this mask now with no loss of detail, so we’ll export the artboard as a png with supersampling.
- Menu File > Export > Export for Screens:
- Select the Artboards tab on the top left and double click the artboard name to rename the artboard to ‘Jumper Stitch Mask’
- Set Scale to 1x
- Set Format to PNG (Small file size and no loss in detail)
- Select the cog to get the ‘Format Settings’
- Set Anti-aliasing to ‘Art Optimized (Super-sampling)’

Save the file, close Illustrator and let’s get this quick next step done.
STAGE 2 – BRINGING IT ALL TOGETHER IN PHOTOSHOP WITH MOSAIC EFFECT AND STITCH MASK
Step 1 – File creation and T-Shirt color
Create a new file in Photoshop with the following settings:-
- Filename: Christmas T-Shirt Image
- Width: 4080px
- Height: 5280px
- Resolution: 300ppi
- Color Mode: RGB
Unlock the background Layer by clicking on the padlock on its layer, then rename it as ‘T-Shirt Color’ and use the Paint Bucket Tool (G) to fill it with a dark blue, RGB 18,36,90
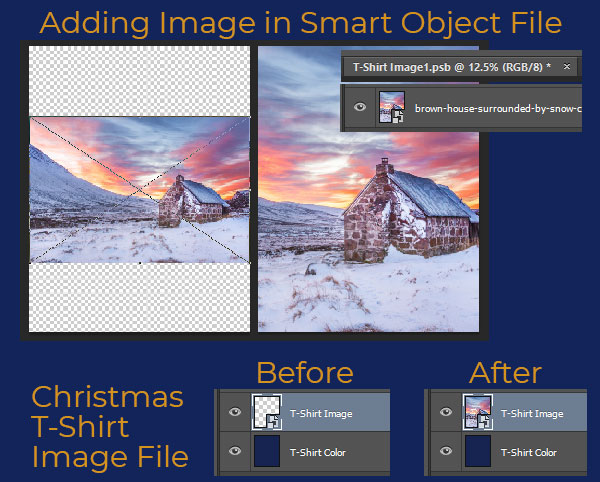
Step 2 – Smart Object Image
The image I used for this was a free one from pexels.com with a punchy filename ‘brown-house-surrounded-by-snow-covered-field-near-snow-179845’ since it’s free, go ahead and download it or use one of your own creation.
First create a new layer,
- Menu Layer > New > Layer (Shift + Ctrl + N): Name it ‘T-Shirt Image’
With this new layer selected,
- Menu Layer > Smart Objects > Convert to Smart Object:
You’ll notice the addition of a little icon on the thumbnail that tells you it’s a Smart Object.
Double click the Smart Object Thumbnail to edit it and you’ll find a new empty file suddenly open called ‘T-Shirt Image’, this is important because it’s where you create your image or paste whatever image you want.
- Menu File >
Place Embedded :
- Select whatever file you want and enlarge it to cover the whole page. I probably don’t need to mention this but please hold SHIFT while you resize so you don’t distort the image.
When you’re done just save the file and it’ll automatically update the Smart Object version.
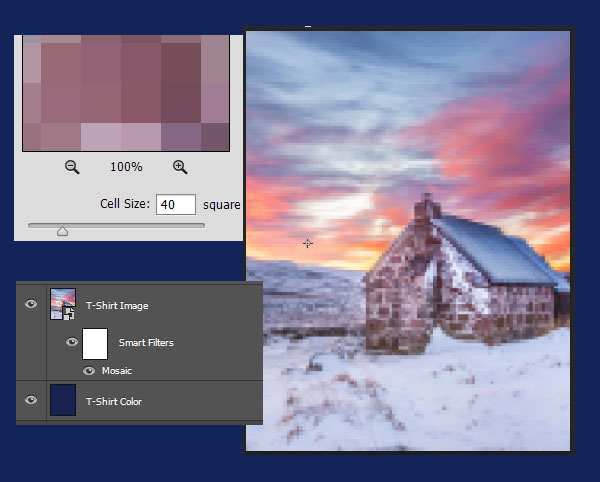
Step 3 – Add Mosaic filter
This time with the ‘T-Shirt Image’ layer selected, let’s go ahead and mosaic this thing.
- Menu Filter > Pixelate > Mosaic: Set cell size to 40
The resulting mosaic tiles fit perfectly across the image with 102 tiles wide and 132 tiles high. The extras round the edge are there because when you have an image that doesn’t extend beyond the page boundaries, you can get edge effects that create pale edges and you don’t want the edge stitches to look odd. The Layer structure now shows a smart filter applied to the ‘T- Shirt Image’ layer.
Step 4 – Add Stitch Mask
Select the ‘T-Shirt Image’ layer and then use.
- Menu File >
Place Embedded:
- Select the ‘Jumper Stitch Mask.png’ you saved earlier
If everything is correct then it should fill the page perfectly and need no resizing. So press ‘Enter’ to accept it and you have a new layer above the image with the mask in. Close but not quite there yet.
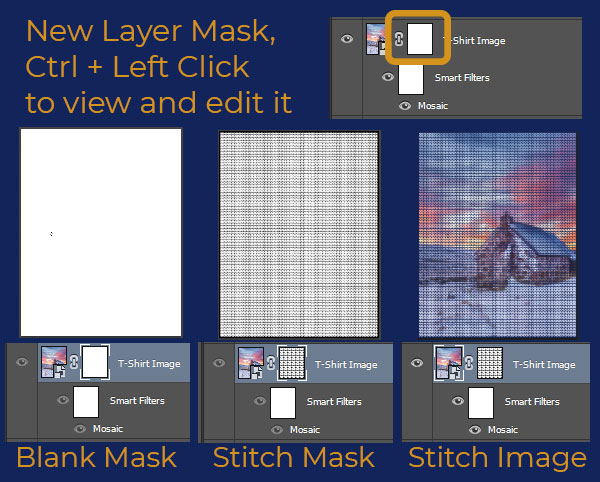
Select the whole page using Ctrl+A, and take a copy of that layer mask using:-
- Menu Edit > Copy Merged
Hide the ‘Jumper Stitch Mask’ Layer, then select the ‘T-Shirt Image’ Layer and add a new layer mask using:-
- Menu Layer > Layer Mask > Reveal All
You will find this adds a blank fully white mask to the ‘T-Shirt Image’ layer which you see to the right of the layer thumbnail. Here’s an essential but not so well known step for selecting and then editing the layer mask directly.
- Ctrl + Left Click layer mask
When you’ve got the mask selected for editing, the page turns white because you’re now viewing the layer mask not the image layers.
- Ctrl + V to paste in the merged copy you took earlier.
You now have the mask in place so just Click the image thumbnail and you’re back to the image layers AND the completed stitch pattern. Notice in the image below that the thumbnails for the layer image and the layer mask have a white outline when you select them.
STAGE 3 – PREP AND SAVE FOR PRINT
Well hopefully you’ve now got a result you’re happy with. This is a high-res file intended for printing on a T-Shirt as I explained earlier. If this is just for digital or fun then you’re finished. Otherwise continue to prepare a file for uploading to T-shirt printing site.
Hide the T-Shirt Color layer so you only see the stitches as this is what gets printed.
- Menu File > Save for Web:
Use the PNG24 preset, as you want the transparency between the stitches, full color and no loss of detail. The file will be big, but high quality.
You will now be able to upload the .png file to a company like streetshirts.co.uk to print the stitch pattern onto a T-shirt colour to harmonise with the main color in your design.
STAGE 4 – REPEAT
The real winner of this technique however is that you now have a template that you can drop any image you like into and generate a stitch pattern. Now you’ve got the template set-up you can drop another image into the Smart Object.
Double click the Smart Object Thumbnail to edit it and you’ll find your image file ‘T-Shirt Image’ open up. You can now add new layers.
- Menu File > Place Embedded
Save It, return to your jumper file and you’ll find your image converted to a stitch pattern ready to go.

If this tutorial was helpful please let me know as any feedback is appreciated. You can also see a few more T-Shirt samples in my portfolio here.
Till next time and remember sharing is caring, so like, pin, share and comment.